slack-bot
Slack Bot
This Slack bot improves the workflow of development teams. Especially with focus on Jenkins, GitHub, GitLab and Jira, as the integration is working out of the box. But also custom commands, macros, crons and other project specific commands can be implemented in a simple and flexible way.
Installation
1st) Create+prepare the Slack App:
Use Manifest file as App template
- Create a Slack App (press “Press “Create New App””)
- Select “From an app manifest”
- Select your Workspace
- Paste this Yaml code:
Click to expand!
```yaml _metadata: major_version: 1 minor_version: 1 display_information: name: slack_bot background_color: "#382e38" features: app_home: messages_tab_enabled: true messages_tab_read_only_enabled: false bot_user: display_name: bot always_online: true oauth_config: scopes: bot: - app_mentions:read - channels:read - channels:history - groups:history - chat:write - im:history - im:write - mpim:history - reactions:read - reactions:write - users:read - files:read - pins:write settings: event_subscriptions: bot_events: - app_mention - message.im interactivity: is_enabled: true org_deploy_enabled: false socket_mode_enabled: true token_rotation_enabled: false ```- Create the App!
- “Basic information” → “Display Information” → Upload Image (512px+!) + Set a proper name
- “App Home” → “Show Tabs” → Check “Allow users to send Slash commands and messages from the messages tab”
- “Basic Information” → “App-Level Tokens” -> “Generate Token and scopes” -> use “bot token” as token name and “connections:write” as scope
- You will see an App-Level Token (beginning with xapp-). Set it in the config.yaml as “slack.socket_token”.
- Basic Information → “Request to install” + “Install to Workspace” continue there
- Then you will get another token (displayed in “Install App” tab), starting with “xoxb-“. Use it as “slack.token” in the config.yaml
- In your slack client you can add the bot now in any channel or start a private conversation.
2nd) Prepare the config
First prepare the config.yaml, just take a look at config-example.yaml
- at least the Slack token+socket-token are required) or take a look in config-example.yaml
3rd) Run the bot
Option 1: run via go
- install go (at least 1.22)
- create a config.yaml (at least the Slack token+socket-token are required) or take a look in config-example.yaml
go run github.com/innogames/slack-bot/v2/cmd/bot
Option 2: via Docker
- install Docker incl. docker-compose
- clone this repo or at least fetch the docker-compose.yaml
- add your Slack user id or user name in the “allowed_users:” section of the config.yaml
docker-compose up
Option 3: Advanced: when planning working on the bot core
- install go
- clone/fork this repo
- run
go run cmd/bot/main.goormake runto run the go application
Usage
As Slack user, you just have to send a private message to the bot user/app containing the command to execute.
Additionally, you can add the Bot to any channel and execute bot commands in it by prefixing your command with @bot_name, e.g. @slack-bot start job DailyDeployment
Note: You have to invite the bot into the channel to be able to handle commands.
Bot Commands
Help
The help command just prints a list of all available commands of this bot.
With help *command* you’ll get a short description and some examples for a single command.

Jenkins
The bot is able to start and monitor Jenkins job in a simple but powerful way.
By default, the commands are not available and not visible in the “help”, till the “jenkins.host” is defined in the config file.
Start Jenkins jobs
The start job command starts a Jenkins job and shows the current progress. Attention: only whitelisted jobs in the config are startable!
In additions, each job can have a configurable trigger which make it possible to create custom commands to start jobs. (it’s a regexp which takes parameter names into account).
E.g. “start daily deployment” could be the trigger for one Jenkins job. Sending this text to the bot would start the job.
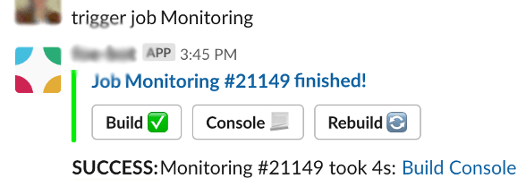
After starting a job, the bot will show the estimated build time and some action buttons. There you can open the logs or abort the build directly.
The bot is also able to parse parameters and lookup branch names using a fuzzy branch search.
Examples:
trigger job DeployBetastart job BackendTests TEST-123(search for a full branch name, containing TEST-123. e.g. feature/TEST-123-added-feature-456)

Jenkins build notifications
The bot also has the possibility to create one time notifications for Jenkins builds. This might be useful for long-running jobs where the devs are waiting for the result.
Example:
inform me about build NightlyTests(watches the most recent running build)inform me about build MyJobName #423(specify a build number)inform job MyJobName(alternative syntax)
Jenkins job notifications
Receive Slack messages for all process builds for the given job:
Example:
watch JenkinsSelfChecknotifies about any build of JobJenkinsSelfCheckunwatch JenkinsSelfCheck
Jenkins status
Small command to disable/enable job execution on Jenkins side.
Example:
disable job NightlyTests(disable job on Jenkins)enable job NightlyTests
Jenkins retry
When a build failed you are able to retry any build by:
Example:
retry build NightlyTests(retries the last build of a job)retry build NightlyTests #100(retries given build)
Nodes
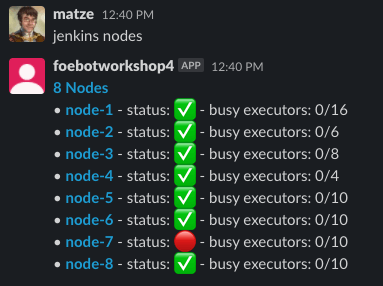
jenkins nodes lists all available Jenkins nodes. The online/offline status and number of executors are visible.
Pull Requests
If you just paste a link to a GitHub/GitLab/Bitbucket/Stash Pull request, the bot will track the state of the ticket!
- When a developer was added as reviewer, it will add an “eyes” reaction to show other devs that someone is already taking a look
- When the reviewer approved the ticket, a checkmark is added
- After merging the pull request, it will add a “merge” reaction
You’re also able to set custom “approved” reactions. E.g to see directly who or which component/department approved a pull request you can use the name of the reaction or the Unicode character directory
Expand example!
```yaml pullrequest: reactions: merged: custom_merge_arrow review: 👀 custom_approve_reaction: nerdydev: "approved_backend" iamamobiledev: "approved_mobile" iamamobiledev2: "approved_mobile" ```
Extra Features:
For Bitbucket, the bot is able to extract the current build status (e.g. from Jenkins/Bamboo etc) and show failed and running builds (fire reaction) as a reaction (circle arrow reaction). When the build is stable, the build reactions disappear.

Command Queue
The queue command (with the alias then) is able to queue the given command, until the currently running command finished.
Example following scenario: you have a build job (which might take some minutes) and a deploy job which relies on the build artifacts. Now you can do:
trigger job Build feature1234to start the Build job with given branchqueue trigger job DeployBranch feature1234queue reply Deployment is done!
Other example:
delay 1hthen send message #backend coffee time?
To see all running background commands (like Jenkins jobs or PR watcher) use this command:
list queue
Jira
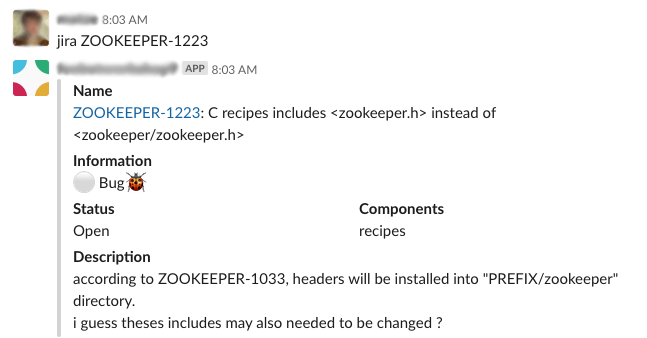
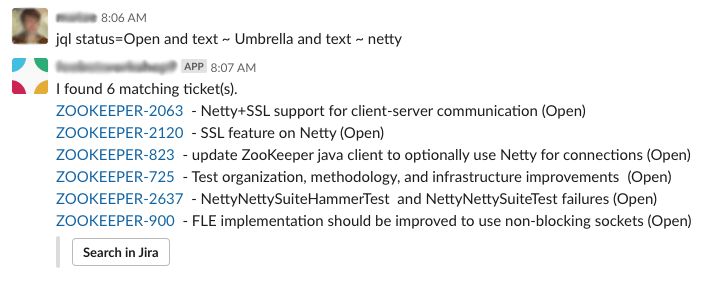
The bot is able to query information from Jira, either from a single ticket, or a whole list of tickets.
By default, the commands are not available and not visible in the “help”, till the “jira.host” is defined in the config file.
Examples
jira TEST-1234jira 1242(opens the ticket, using the configured default jira project)jql type=bug and status=open(use default project by default)jira "Second city"(text search of tickets in default project)
It’s also possible to get a notification when there is a state change in a certain Jira ticket.
Example
watch ticket PROJ-12234
Interactions
It’s possible to create buttons which are performing any bot action when pressing the button. Slack interactions
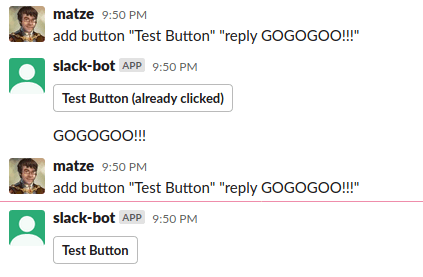
Examples:
add button "Start Deployment" "trigger job LiveDeployment"
Note
- only whitelisted users can click the button
- each button is only active once
Custom variables
Configure user specific variables to customize bot behavior. E.g. each developer has his own server environment.
Example: Having this global config:
commands:
  - name: Deploy
    trigger: "deploy (?P<branch>.*)"
    commands:
      - deploy  to
Each developer can now call ONCE this commands like: set variable defaultSerer foobarX.local to register the custom “defaultServer”.
When now calling deploy mater, it will deploy the master branch to foobarX.local server.
Another example
Here an advanced version which uses Go templates.
In the end, the command will generate one subcommand, like:
reply <!here> demo for <https://jira.example.com/TEST-1234|TEST-1234: Example-Ticket> which will post the link to the Slack channel.
  - name: demo
    trigger: "demo (?P<ticketId>\\w+-\\d+)"
    commands:
      - |


          reply <!here> demo for <|: >

          reply Ticket  not found :white_frowning_face:

    description: Informs the current channel about a demo of a Jira ticket. It directly posts a link to the ticket
    examples:
      - demo XYZ-1232
User can define his default environment once by using set variable serverEnvironment aws-02.
Then the deploy feature-123 will deploy the branch to the defined aws-02 environment.
Each user can define his own variables.
Openai/ChatGPT/Dall-e integration
It’s also possible to have a ChatGPT like conversation with the official OpenAI integration (GPT3.5)!

Just type “openai” or “chatgpt” before your question to create a new thread which behaves like the well-known ChatGPT page. The content of the last 10 messages is used as context. To make it work, a valid “openai.api_key” must be provided in the configuration.
Extended config:
openai:
  api_key: "sk-123....789"
  initial_system_message: "You are a Slack bot for Project XYZ, please answer shortly."
  update_interval: '3s' # fewer Slack messages update during generation
  model: gpt-3.5-turbo
  temperature: 0.8
  log_texts: true # opt in: log all input/output text to the log
When using the “openai XXX” command within a existing thread, the previous messages are used as context for further calls.
It also possible to use the function in the templates (like in custom commands or crons).
`` would print something like Hello Jon, welcome! How can I assist you today?
DALL-E integration
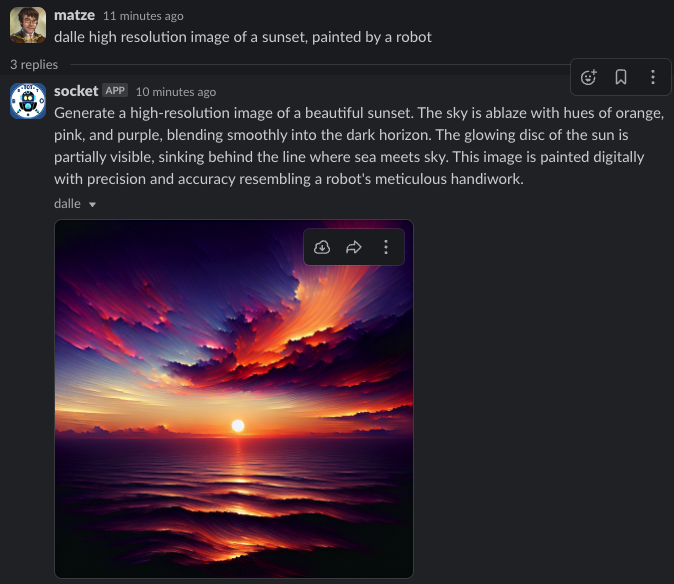
The bot is also able to generate images with the help of DALL-E. Just prefix you prompt with “dalle” and the bot will generate an image based on your text.
Quiz command
If you need a small break and want to play a little quiz game, you can do so by calling this command. No more than 50 questions are allowed. The questions are from different categories and difficult levels and are either multiple choice or true/false questions.
Commands
quiz 10to start a quiz with 10 questionsanswer 1to answer a question with the first answer

Weather command
It’s possible to setup OpenWeatherMap to get information about the current weather at your location.

Example config:
open_weather:
  apikey: "612325WD623562376678"
  location: "Hamburg, DE"
  units: "metric"
Custom command
Every user is able to define own command aliases. This is a handy feature to avoid typing the same command every day.
Example usage
list commandsto just list the defined commands for the current useradd command 'myCommand' 'trigger job RestoreWorld 7-> then just callmyCommandlateradd command 'build master' 'trigger job Deploy master ; then trigger job DeployClient master'delete command 'build master'- -> then you can execute
myCommandto trigger this Jenkins job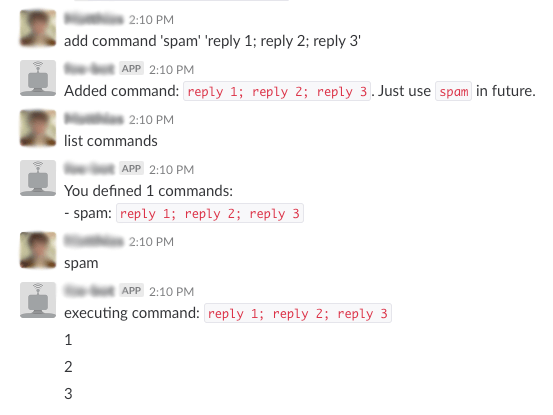
Commands
Defined “Commands” (former called “Macros”) are very magical and can be defined in the yaml configuration files.
They have a trigger (a regular expression) and have a list of sub commands which will be executed. They take parameter groups from regexp into account - so they can be very flexible!
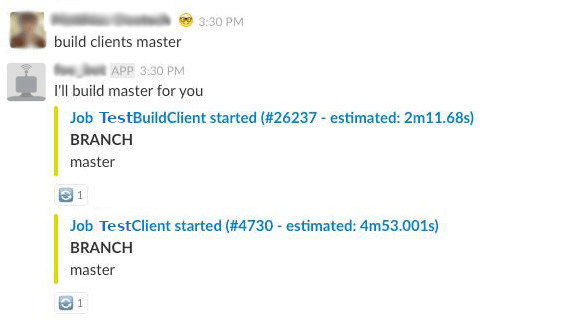
One simple example to start two Jenkins jobs with a given branch name at the same time:
commands:
 - name: build clients
   trigger: "build clients (?P<branch>.*)"
   commands:
    - "reply I'll build  for you"
    - "trigger job BuildFrontendClient "
    - "trigger job BuildMobileClient "
    - "then reply done! :checkmark:"
Note: In the commands, you can use the full set of template features of go -> loops/conditions are possible!
Template functions
Beside the usual template features of go a bunch of bot specific commands are available in the template scope.
A list of all available functions (with arguments and return types) can be generated by using the list template functions command.
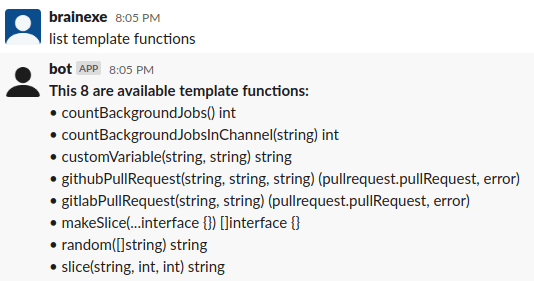
Note: This template functions can be used in different commands/features:
- Crons
- Defined commands (via .yaml)
- Custom commands (defined per user)
- Jenkins hooks (like sending custom message when a Job fails)
Retry
With retry or repeat your last executed command will be re-executed. -> Useful when a failed Jenkins job got fixed.
Delay
A small command which might be useful in combination with command command or as hook for Jenkins jobs.
Example command: delay 10m trigger job DeployWorldwide
As reply you’ll get a command to stop the queued job (like stop timer 123456). As everyone can send the command, the command can be used to announce a deployment and in doubt, the execution can still be stopped by everyone.
Reply / send message
reply and send message are also small commands which are useful in combination with command or Jenkins hooks.
Examples:
send message to #backend The job failed :panic:delay 10m send message to @peter_pan I should notify you to...
Random
Simple command if you are not able to decide between different options
Examples
random Pizza Pasta-> produce either “Pizza” or “Pasta”random Peter Paul Tom Jan-> who has to take about organizing food today?
Installation
- Make sure Go version 1.12+ is installed
- clone the project
- create config file called
config.yaml(you can take a look atconfig.example.yaml)
Run without docker
This command will start the bot, using the config.yaml file by default. Use the -config argument to use the config file(s) from another location.
go run cmd/bot/main.go
Run via docker-compose
Attention: Create a config.yaml file first
docker-compose up
Configuration
The configuration is managed via simple .yaml files which are storing the credentials for the external services and the custom commands etc.
The easiest way is to just have one config.yaml file with all needed options included, the config.yaml is loaded by default. It’s also possible to split up the configuration into multiple files.
Example structure with multiple config files:
secret.yamlcontaining the credentials for the external services (Slack, Jenkins) - can be managed by puppet/ansible etc.jenkins.yamlconfiguration of Jenkins job and their parameters etcproject-X.yamlcustom commands for a specific teamproject-Y.yaml
To load the multiple config files, use go run cmd/bot/main.go -config /path/to/config/*.yaml which merged all configs together.
Slack
To run this bot, you need a “bot token” for your Slack application. See the installation section on how to create a proper app with the needed tokens.
Jenkins config
To be able to start or monitor Jenkins jobs, you have to setup the host and the credentials first. The user needs read access to the jobs and the right to trigger jobs for your whitelisted jobs.
jenkins:
     host: https://jenkins.example.de
     username: jenkinsuser
     password: secret
Jenkins jobs
To be able to start a job, the job and its parameters have to be defined in the config.
A job without any parameter looks very simple:
jenkins:
  jobs:
    CleanupJob:
Then you can use trigger job CleanupJob or start job CleanupJob to start the job. It will also notify you when the job succeeded or failed (incl. error log).
Next, a job with two parameters:
jenkins:
  jobs:
    RunTests:
      parameters:
      - name: BRANCH
        default: master
        type: branch
      - name: GROUP
        default: all
This job can handle two parameters:
- BRANCH: VCS branch name, “master” as default
- GROUP: optional parameter, using “all” as default
If you setup the VSC in the config, you don’t have to pass the full branch name, but can use the fuzzy search.
Example:
start job RunTestswould start “all” groups on master branchstart job JIRA-1224 unitwould try to find a matching branch for the ticket number. (Error message if there is no unique search result!)
Now a more complex example with more magic:
jenkins:
     jobs:
       DeployBranch:
         trigger: "deploy (?P<BRANCH>[\\w\\-_\\.\\/]*) to (?P<ENVIRONMENT>prod|test|dev)"
         parameters:
         - name: BRANCH
           default: master
           type: branch
         - name: ENVIRONMENT
         onsuccess:
          - reply Tadaa: Take a look on http://.example.com
Step by step:
The trigger is a regular expression to start the job, which may contain named groups. The regexp groups will be matched to the job parameters automatically.
Then you can use deploy bugfix-1234 to test to start the Jenkins job.
Note: You can always start this job also via start job DeployBranch master. The trigger is just an alternative.
The onsuccess is a hook which will be executed when a job is started via this bot.
In addition, onsuccess and onerror is also available…e.g. to send custom error messages.
Cron
It’s possible to define periodical commands via crons, using the robfig/cron library.
Example config
crons:
  - schedule: "0 8 * * *"
    commands:
      - trigger job BuildClients
      - then deploy master to staging
    channel: "#backend"
VCS / Stash / Bitbucket
To be able to resolve branch names in Jenkins trigger, a VCS system can be configured (at the moment it’s just Stash/Bitbucket).
vcs:
  type: bitbucket
  host: https://bitbucket.example.com
  username: readonlyuser
  password: secret
  project: MyProjectKey
  repository: repo_name
If no config is provided, there is no automated branch lookup and the “branch” parameters are passed 1:1 to the Jenkins job.
Disable commands/features
Some features might not be needed in your environment. Most ones are not active if the credentials are not provided, like for Jira or Bitbucket.
Some other ones can be disable via config:
games:
  enabled: false

custom_commands:
  enabled: false

custom_variables:
  enabled: false
Development
File structure
bot/contains the code classes of the bot: connection to Slack, user management, command matching…cmd/bot/entry points aka main.go for the bot and the CLI test toolcommand/real command implementing the bot.Command interface
Create a new (native) command
If you need a new command, which is not implementable with a “command” command, you have to write go code.
- create a new file within the “commands/” directory or one submodule of it
- create a new struct which fulfills the bot.Command interface. The service.SlackClient might be needed as dependency
- GetMatcher() needs to provide the information which command text is matching our command
- register the command in command/commands.go
- restart the bot application
- it’s recommended to fulfill the bot.HelpProvider (your command will show up in `help)
- it’s also recommended to create an integration test for your command
CLI tool
There is a handy CLI application which emulates the Slack application…just chat with your local console without any Slack connection!

make run-cli
Auto live reload
make air to use the “air auto reload tool”.
Testing
There are a bunch of tests which can be executed via:
make test
Test coverage is generated to build/coverage.html
make test-coverage


